Categories
Bars Classic Favorites Desserts with Fruit Stuff Your Parents Would Like

Money Can’t Buy Happiness. But It Can Buy Netflix And Large Quantities of Granulated Sugar Sooo…

road house

As many of you probably know by now, I tend to become obsessed with, and then unhealthily attached to, certain pop culture phenomenons which I seem to have trouble moving on from– see: Hologram TupacHobbits. My latest? ROAD HOUSE. Was anyone ever going to tell me about Road House, or was I just supposed to stumble upon it one humid, lazy Saturday night, and then stumble upon it again the following Sunday, and then rewind certain key scenes throughout the week until my Netflix account mysteriously stopped working?! (Fine. Jimmy found the tai chi moves I borrowed from the movie to be endearing, but the attempts to suplex him, not so much. He took away our router until I promised to give the movie a rest, and it is the single greatest act of kindness he has ever bestowed upon me.)

Speaking of kindness though, originally I was going to post that mellow, heart-tugging meme that you’ve likely seen on LinkedIn about being kind to everyone because we’re all facing our own battles, but then I realized that A ROAD HOUSE IMAGE WAS AN OPTION. And this one is so much better in so many ways. This week alone (it’s only Tuesday guys, I know) I’ve been offhandedly insulted three different times by two people very close to me and one person I barely know, and none of these people seem to have taken that sweet little viral meme to heart. So maybe it’s time to stop being polite, and start getting real (that’s Swayze too, right?).

It’s definitely better than trying to throw money at my problems until they go away, which is sort of my MO these days. Retail therapy is quite possibly the worst type of panacea for depression when you’re kind of broke. (It’s probably super unhealthy for rich/normal people as well, but maybe ya’ll are buying yourselves into unending bliss, IDK.) I seem to have fallen victim to some serious sadness AND some wicked end-of-summer sales at exactly the same time, which is provoking some really deep thoughts. Should I get this mason jar that I can have my name engraved into because it’s on sale? Then everyone in my household (Jimmy) will know which mason jar is mine. I should. Of course I should. What about a monogrammed Lazy Susan? Who even is Susan? That seems like the worst thing to have named after you. Sucks for you, Susan. Now the whole world knows what a disaster you are.

I ended up buying a t-shirt that says “Happy Thoughts” (LOLOL) and knee-high Smartwool socks. I know we’re in a heat wave. They were cheap. I was sad. I have no segues for what I baked today.

Pink Lemonade Bars

adapted from Smitten Kitchen

For the crust

1/4 cup granulated sugar

1/2 teaspoon of lemon zest

1/2 cup of butter, diced into small chunks

1 cup of all-purpose flour

For the pink lemonade topping

1/2 cup of raspberries

2 large eggs

3/4 cup of granulated sugar

1/4 cup of lemon juice

1/3 cup of all-purpose flour

Powdered sugar for dusting, optional

Preheat your oven to 350ºF and line a 8×8″ square pan with parchment paper. Butter and flour the parchment and set aside.

For the crust, in a food processor or blender, pulse together sugar, lemon zest and salt (if using unsalted butter). Add in butter and pulse until somewhat incorporated. Add in flour and pulse until you’ve got a crumbly mess. Really. Though it is sweet messy fun to press this into your parchment-lined pan, I promise. Press it as evenly as you can along the bottom, and bake for 15 minutes, removing when the edges are lightly browned. Keep your oven on while working on the topping.

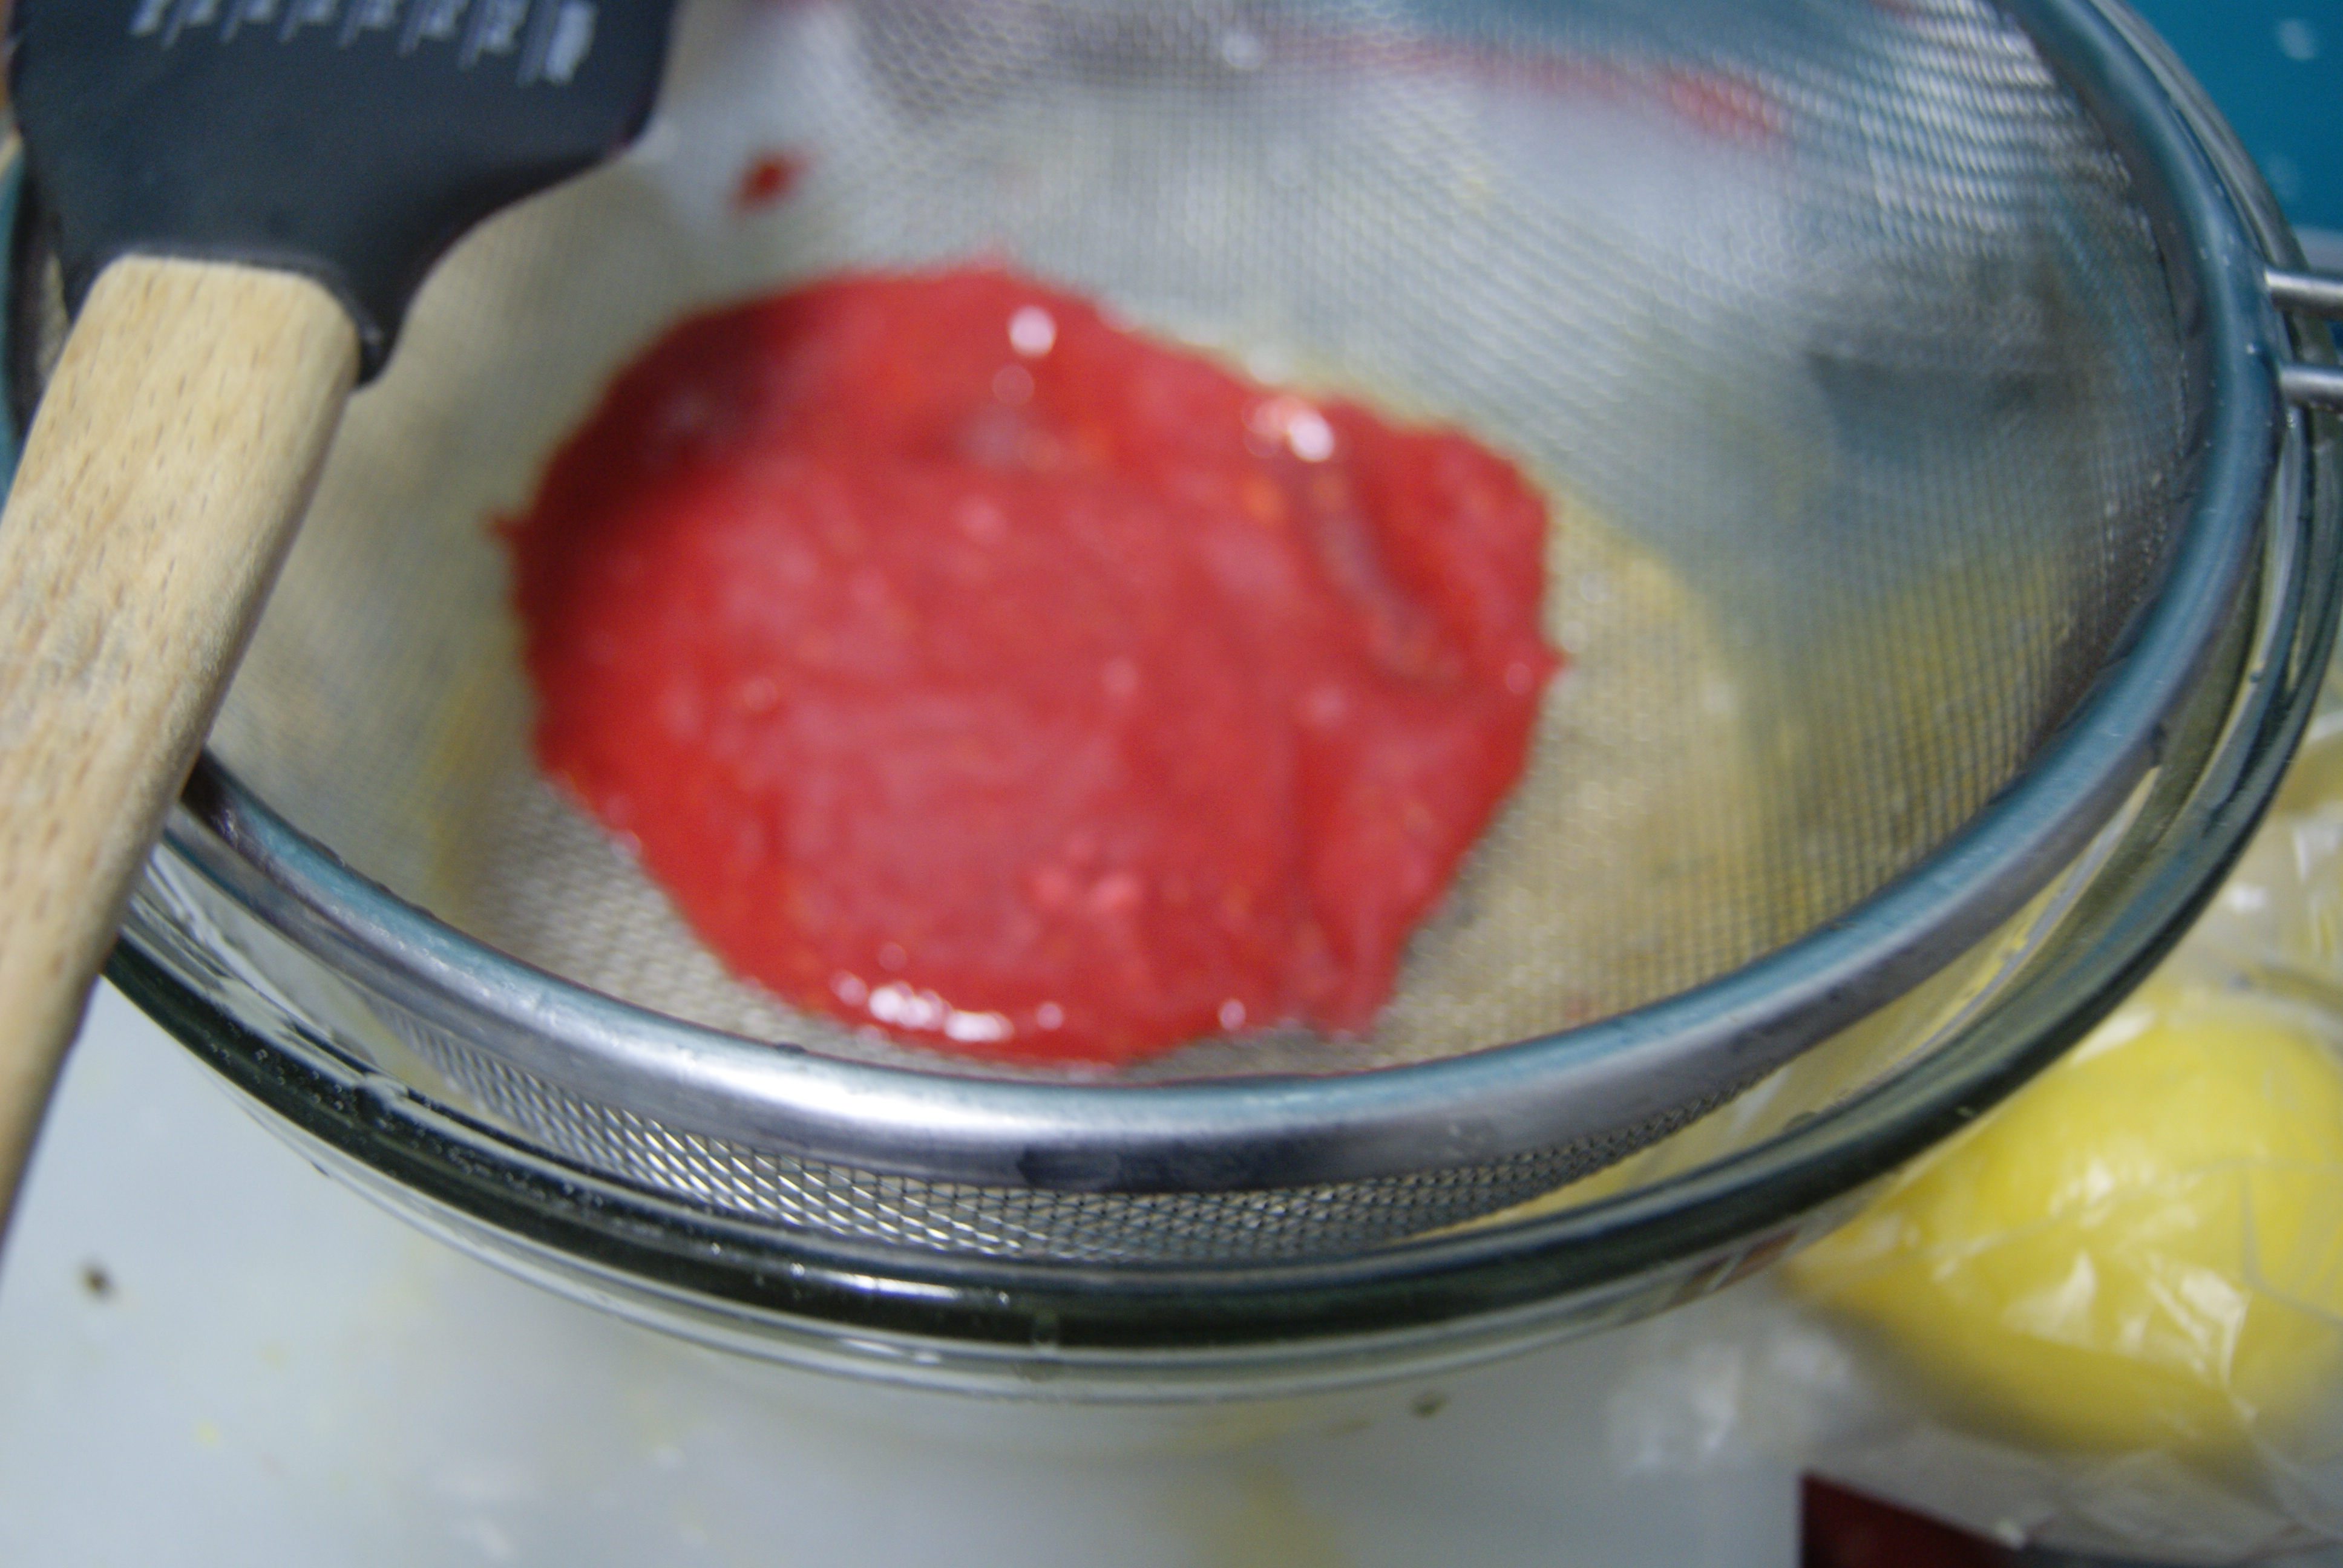
For the topping, beat together eggs, sugar and lemon juice in a large bowl until smooth. Puree raspberries in blender until liquid, or liquid-y. Strain out seeds with a sieve, and then stir puree into lemon mixture. Because I am lazy, I strained the puree directly into my lemon mixture, and I encourage other lazy people to do the same.

SONY DSC

Vibrant huh?
Vibrant huh?

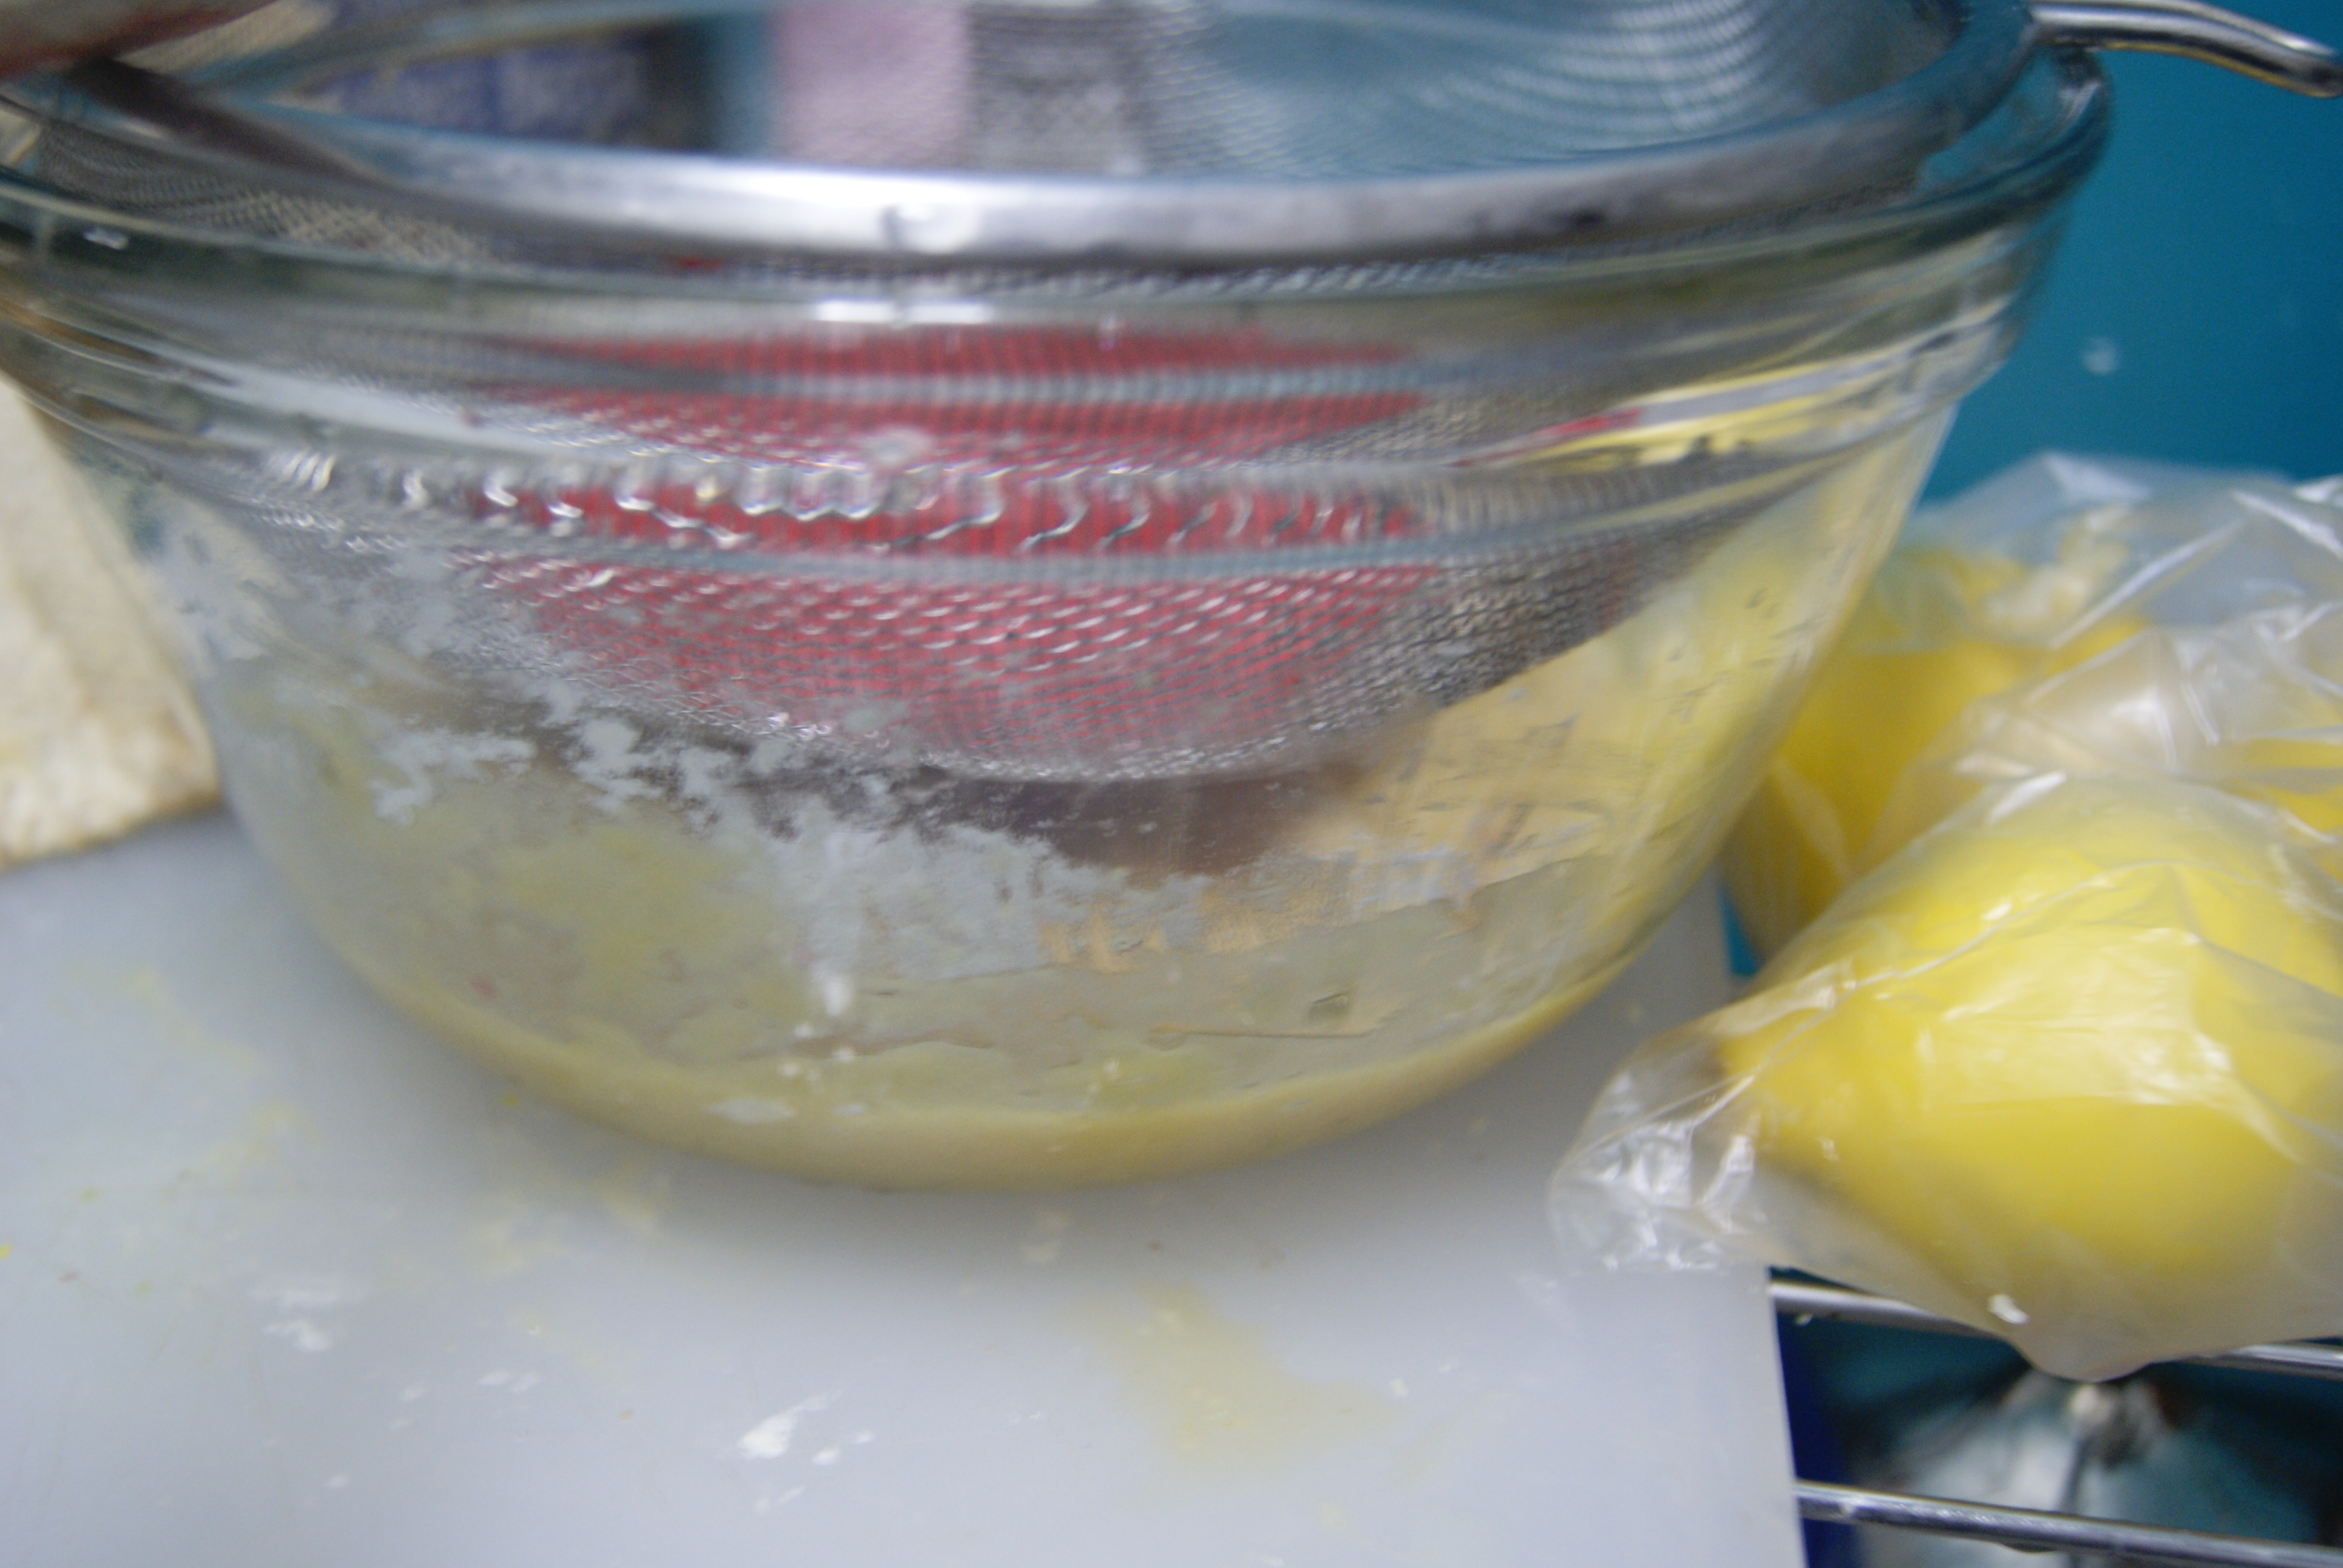
Stir flour into mixture and pour mixture over your crust. Send back into the oven until the top jiggles just a bit, about 25 to 30 minutes (mine took about 25). Let cool in pan for about 10 minutes, then transfer parchment to a rack to allow to cool completely before cutting.

SONY DSC

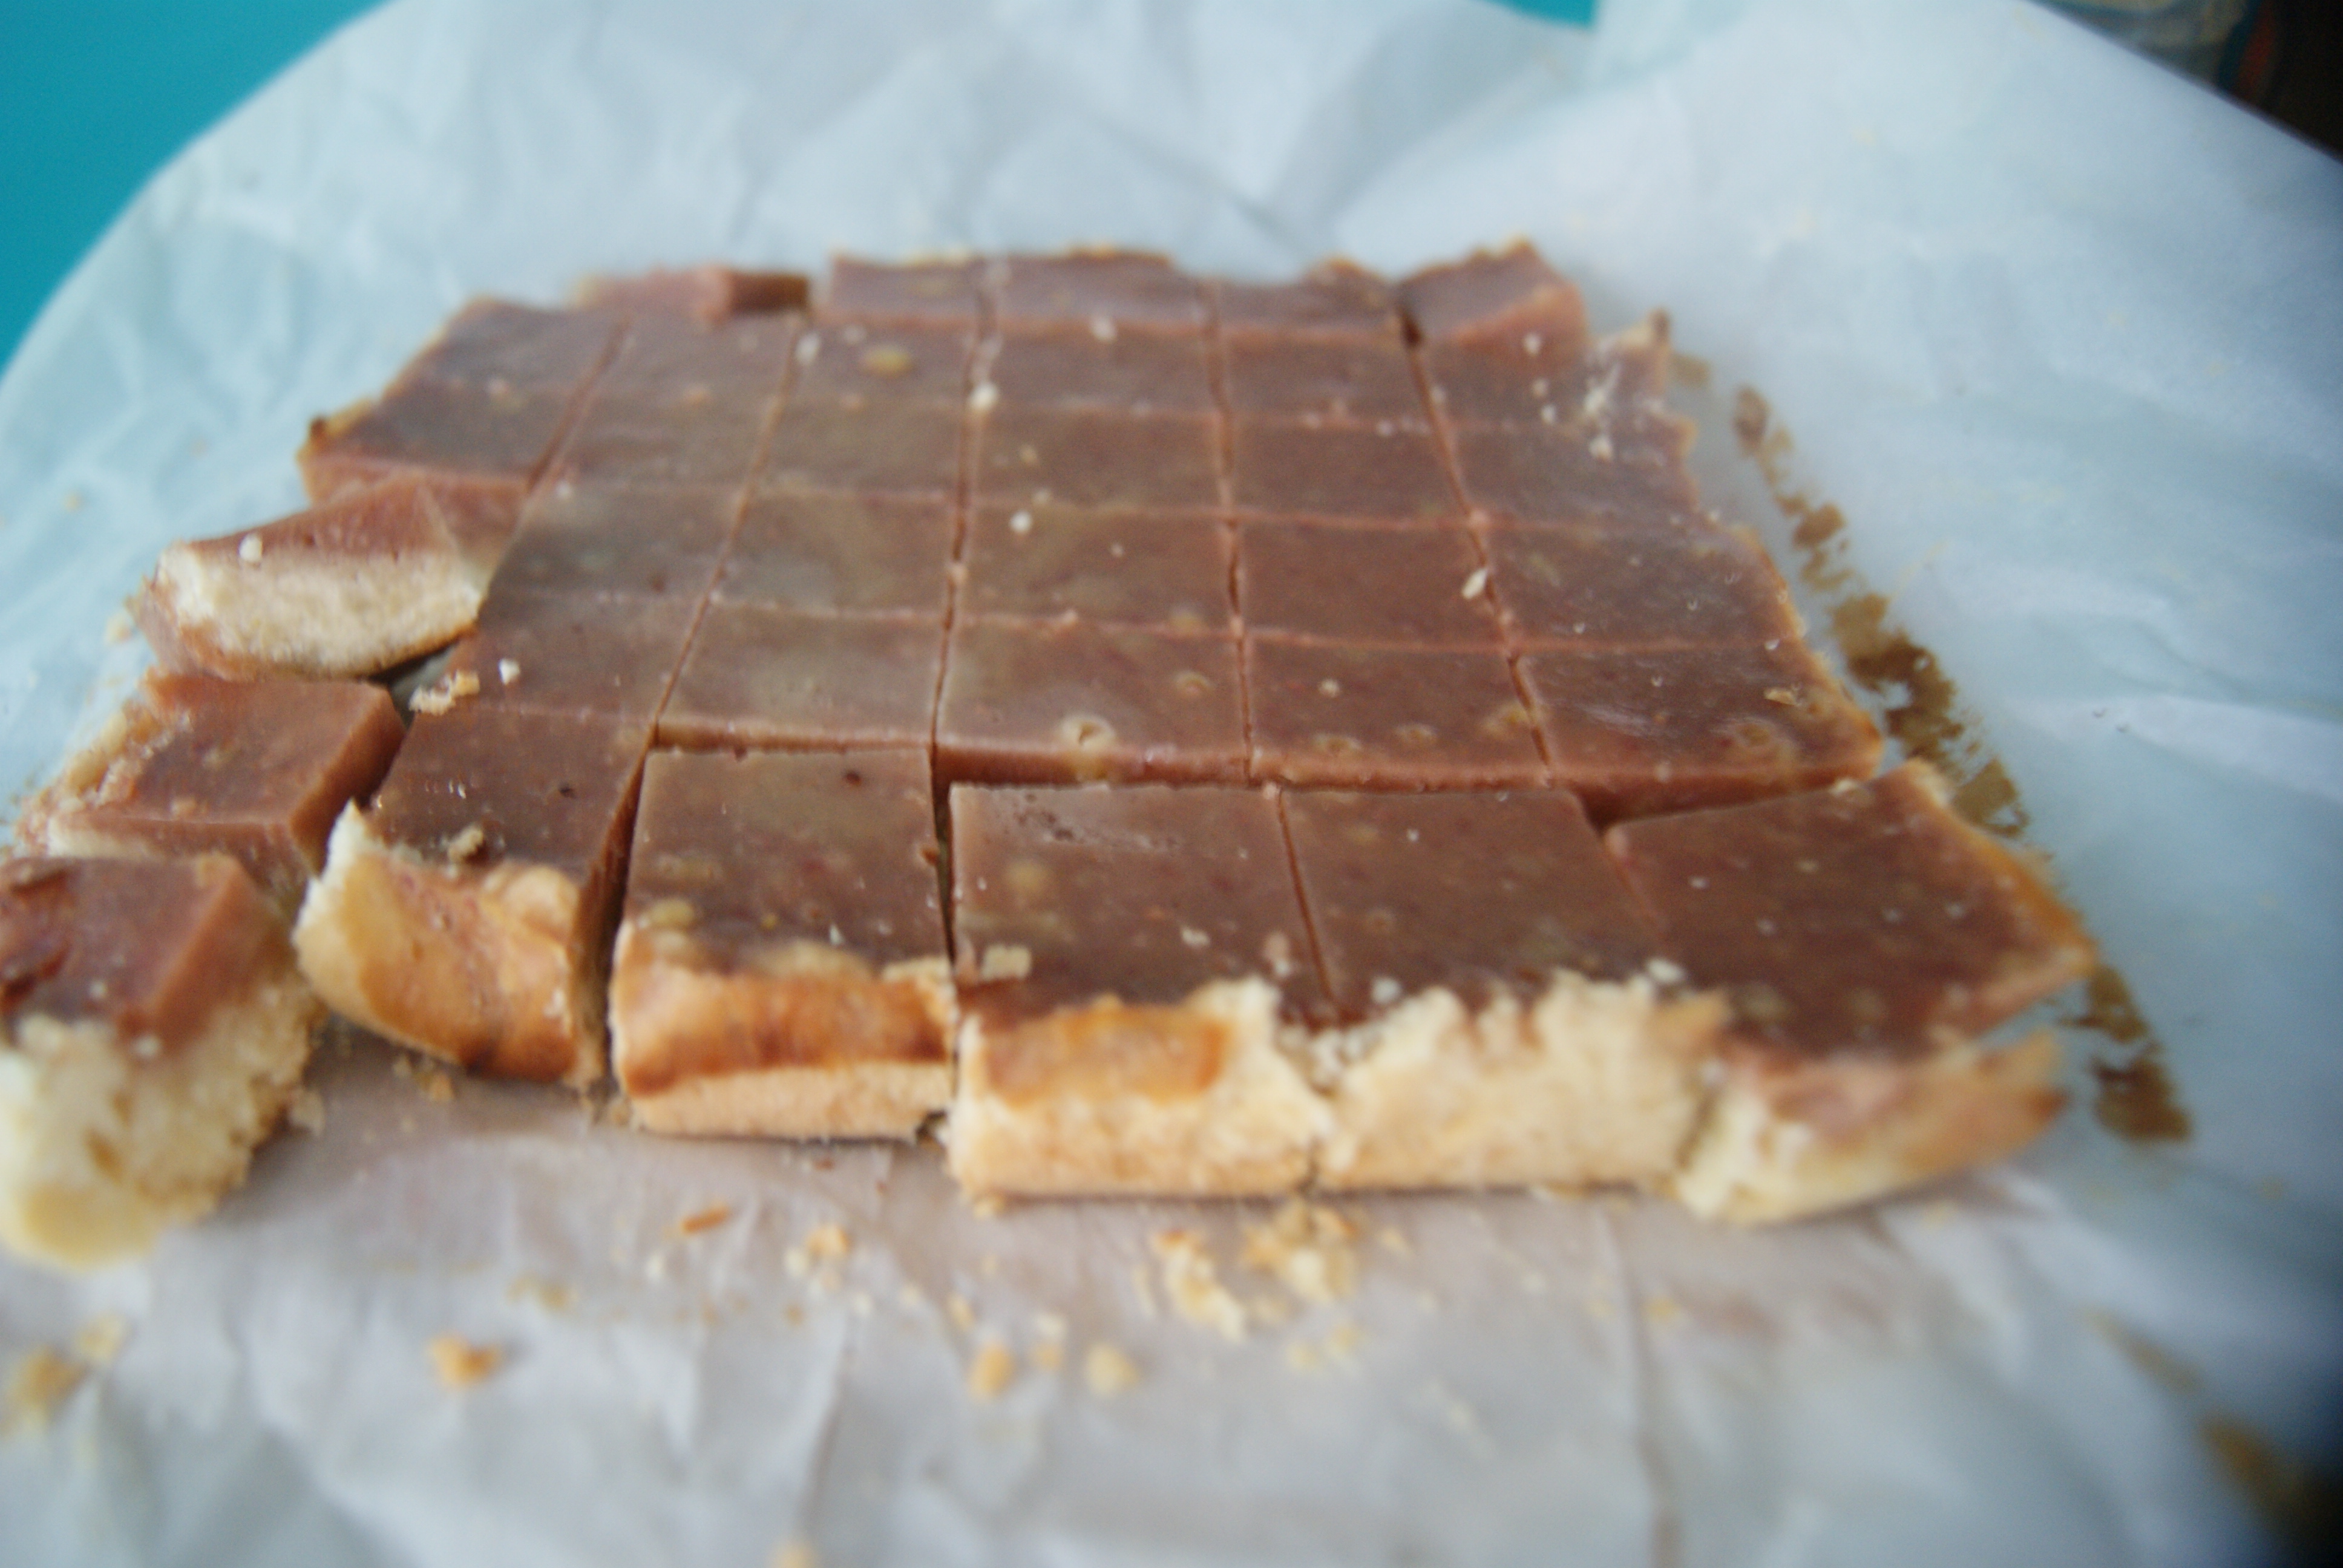
I forgot the powdered sugar on mine 😦 which may work out for those of you who are happy with not-too-sweet treats.

SONY DSC

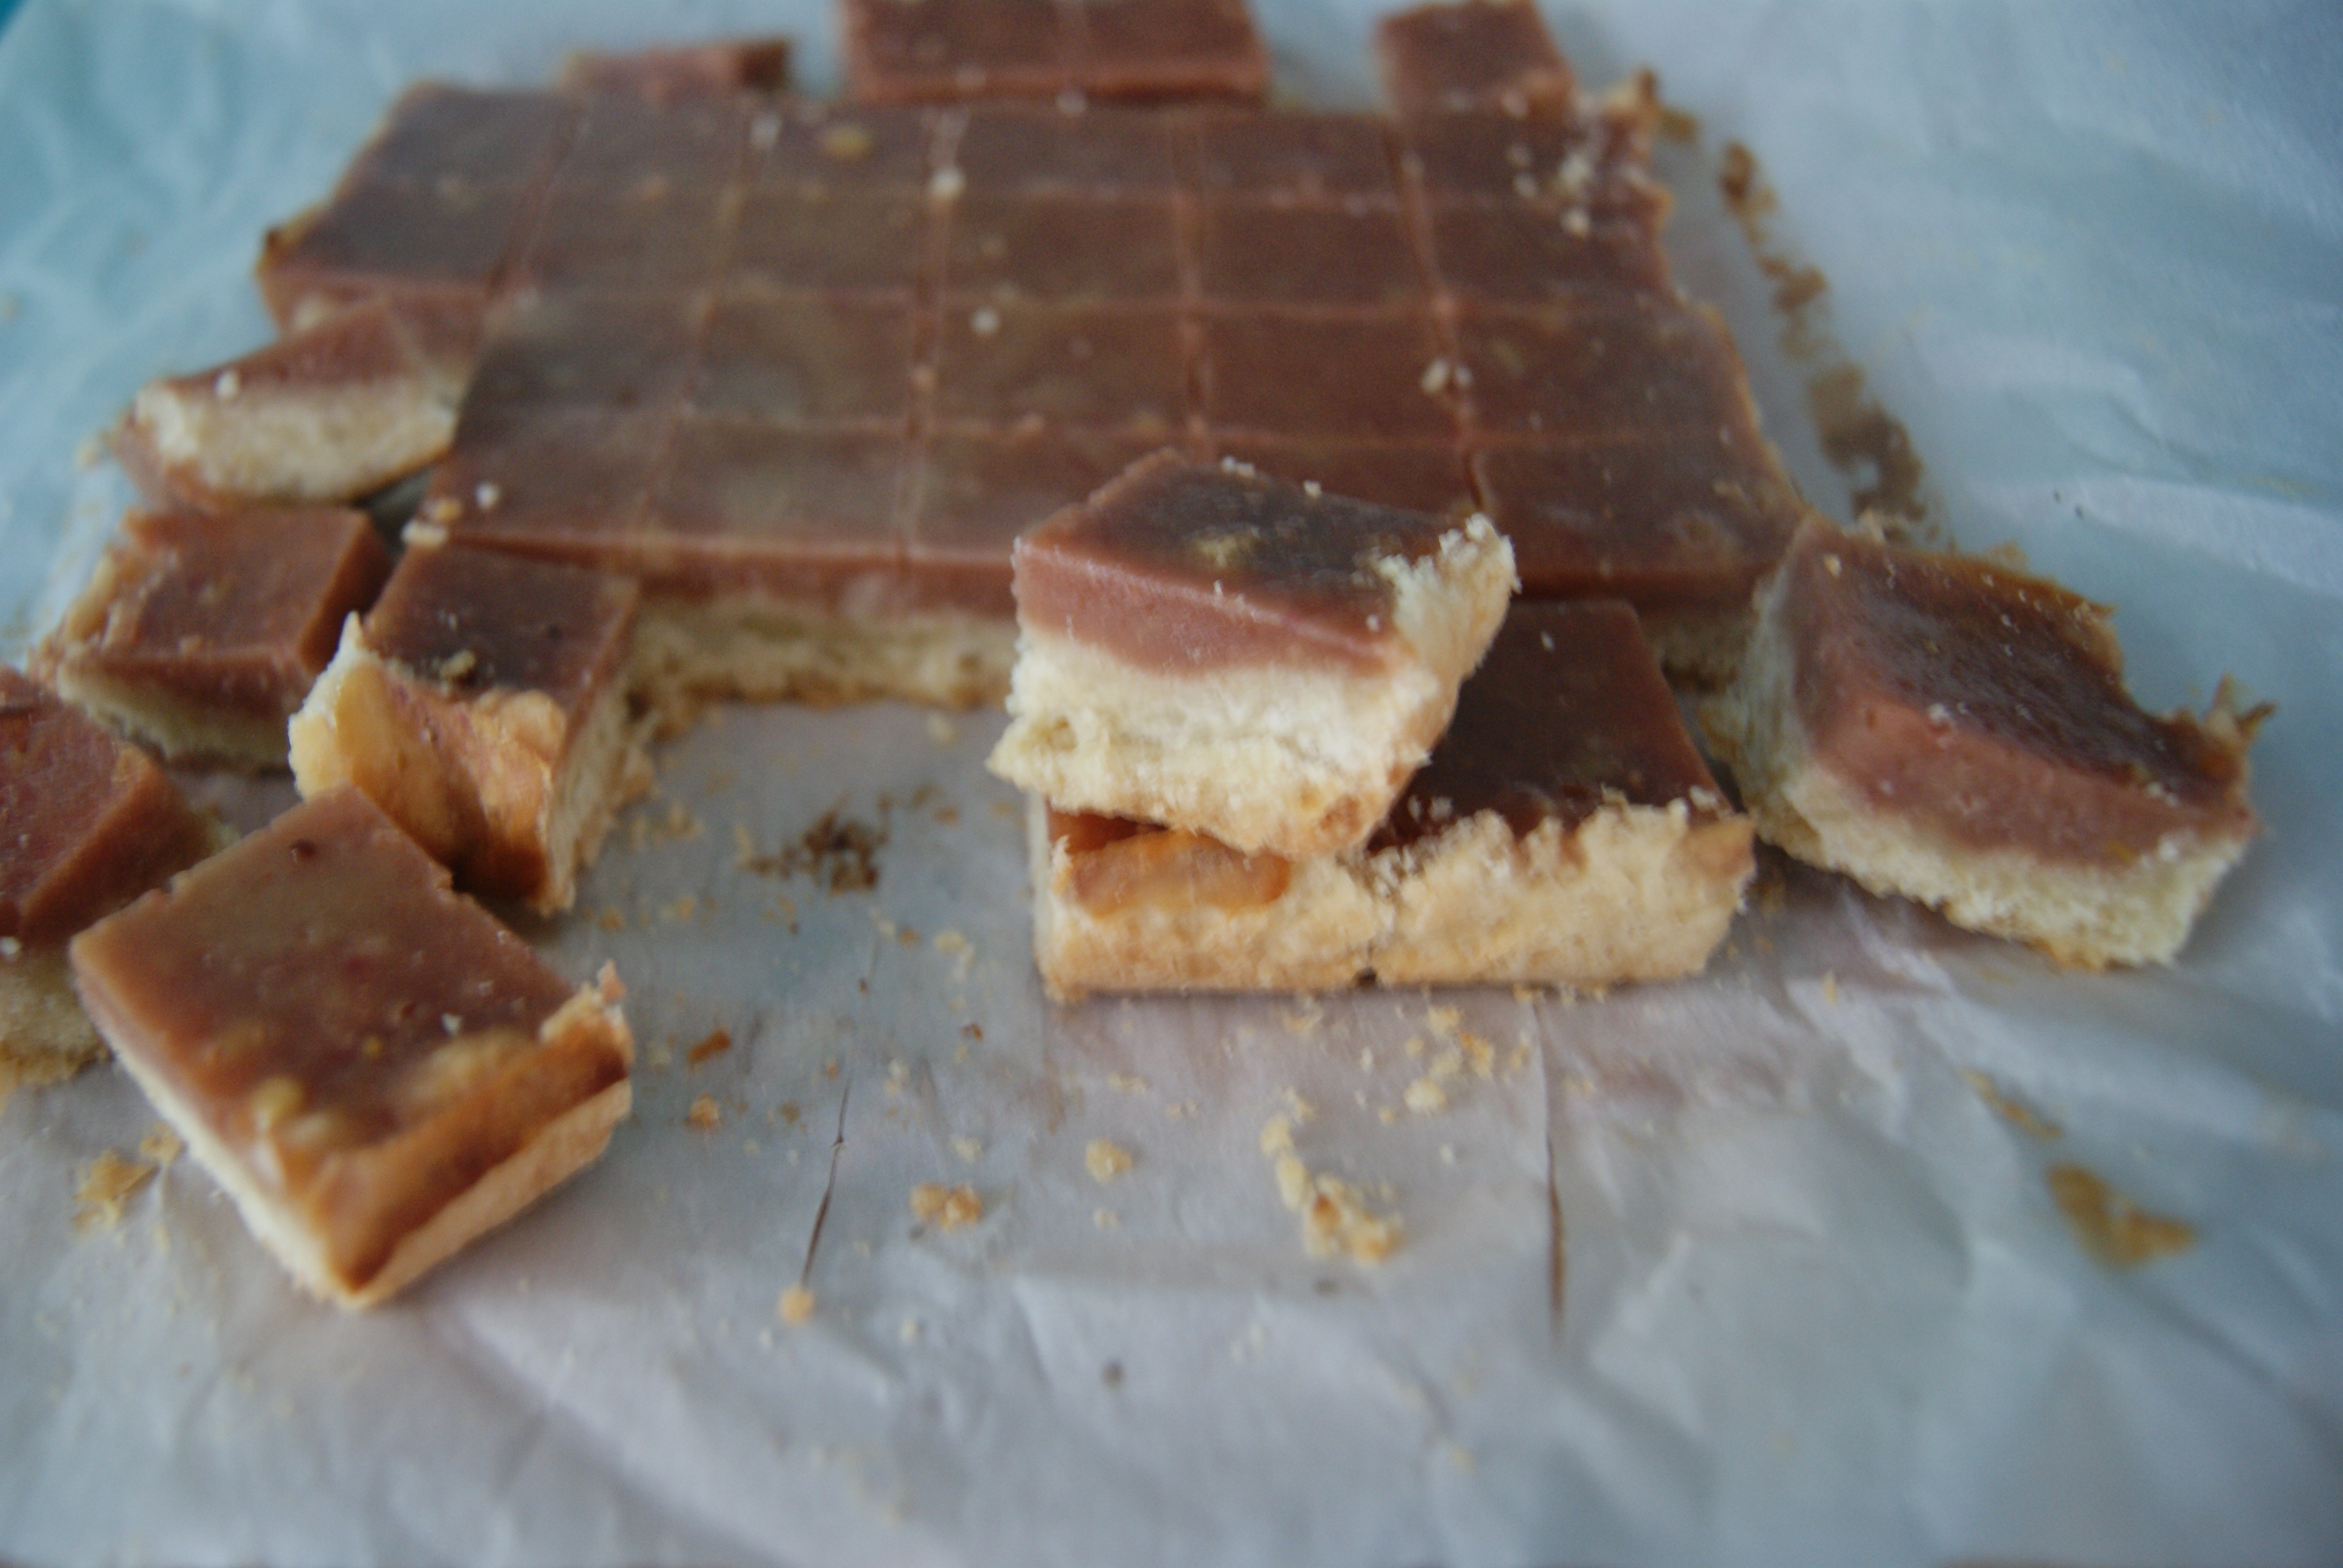
As you can see, these bars have a nice, thick, buttery crust which sort of turned them into an automatic WIN for me. The topping? Totally tasted the pink lemonade and LOVED it. Together crust and topping make for a happy, buttery, super lemony treat that is definitely worth the [oven] time, and is CERTAINLY a better use of your/my time than suplexing your partner and buying nonsense with your name on it.

Categories
Bars Chocolate Cheer Classic Favorites Cookies Fancy Pantsy

Homemade Mallobars. (East Coast… Can Ya’ll Really Feel Me?)

*Today’s post is going to be focused on the dessert and will contain little to no complaining on my part, just to see what being a primarily baked good-centered blog feels like.*
http://www.youtube.com/watch?v=VRhHwHHKBss

So, how do you all feel about Mallomars?

I have no idea if those of you not in the Northeast are privy to the awesome power of the Mallomar. Last I heard, it was an East Coast thang.

I am unsure of my feelings on them.

So unsure that I had to go through several boxes of the seasonal treat this past winter to determine my feelings on them.

So unsure that I attempted to store three boxes away in my freezer so that I could continue to test them during the off-season. (Note: the aforementioned boxes have since mysteriously disappeared)

So unsure that when I realized my reserve boxes had gone missing (Ed note: contents of box were later determined to have been consumed by one James Hilger. Mr. Hilger resides with the author, and will pay dearly for his mistake) I furiously hunted down a homemade recipe for the treat, and vowed to make them as a summertime treat. In your sugar-coated face, archaic Nabisco rules!

If you want the truth, I actually respect Nabisco for attempting to limit my intake of this marshmallowy, chocolate-covered delight on a graham cracker platform. It’s a pretty good marketing strategy, considering the number of salivating Mallomar-devotees lurking outside of my– let’s face it, everyone’s– local Key Food come wintertime. But I just can’t live without ’em. I… I can’t. And so I attempted to make my own. Let’s do this, friends.

Homemade Mallobars (they’re bars because I cut them into bars, because I did. These made about 40 for me)

From the James Beard Foundation

For the Graham Crackers

1/2 cup plus 2 tablespoons of all-purpose flour

1/2 cup plus 2 tablespoons of whole wheat flour (also called graham flour)

Pinch of salt

1/4 teaspoon of baking soda

6 tablespoons of softened butter

2 tablespoons plus 1 1/2 teaspoons of white sugar

2 tablespoons of brown sugar

5 teaspoons of honey

1 egg, beaten

1/2 teaspoon of vanilla extract

For the Marshmallow

1/3 cup of water, plus extra for cooking

1/2 teaspoon of vanilla extract

2 envelopes of plain gelatin

1 cup of white sugar

1/2 cup of light corn syrup

For the chocolate coating

1 1/2 cups of dark chocolate, chopped

We begin with our graham crackers. Now, if I were you, I’d start making these at least a day in advance of when you’d like to enjoy them, mostly because the graham crackers require a fair amount of chilling before being baked. Trust me, these will be well worth the wait.

In a large bowl, whisk together your flours, salt and baking soda. In a separate bowl, cream together butter and sugar until combined, then add in honey. Mix in the egg and vanilla until fully incorporated. Combine with dry ingredients and mix just until batter forms. Cover bowl and chill dough for at least two hours.

Remove dough from bowl and place between two large sheets of parchment paper. Roll out into a 1/8 inch thick sheet. Transfer flattened dough to a baking sheet and refrigerate again for at least an hour, or overnight.

When ready to bake, preheat oven to 325ºF. Carefully remove parchment sheet on top of dough. From here, you can either cut rectangles/squares of dough or bake as an uncut sheet, which is what I did. Transfer to parchment-lined baking sheets and bake for 14 minutes, rotating sheet halfway through baking. Remove from oven and let crackers cool completely.

These are what my rando-shaped graham crackers look like. They look so weird, I know. The taste, however, will make you want to slap the makers of Honey Maid in the face for ever deceiving you.

So…. I decided to taste-test these before continuing on in my mission, mostly because I don’t know that I’ve ever eaten a homemade graham cracker. And I am now sorry that I have spent so much of my life on the store-bought stuff. The homemade ones were soft, sweet and had a deep, almost nutty flavor to them. I hope I never again let my laziness get the better of me by going with the pre-made stuff.

And now, on to the marshmallows. We’ve made marshmallows here before, and this won’t really be any different, but I’ll take you through the steps again so you won’t have to click back and forth.

To make your marshmallows, combine water and vanilla in a small bowl. Sprinkle gelatin evenly over water and set aside for at least 10 minutes. In a separate saucepan, mix together sugar and corn syrup. Pour in just enough water to make the mixture resemble wet sand. Bring mixture to a boil, then lower heat to medium. Cook until the mixture reaches 260ºF (note: if you don’t have a candy thermometer, you can cook until the mixture reaches “soft ball stage.” Place a tiny amount of mixture in a bowl of cold water– if it becomes a soft ball, the mixture is ready to be taken off the heat), then remove from heat. Carefully stir water/gelatin mixture in, and stir until dissolved.

Transfer mixture to a stand mixer and whisk on high speed, taking care that mixture doesn’t splatter. Mix until thickened as much as possible, about 7 minutes. Next, you can either fill a pastry bag with marshmallow mixture or use a rubber spatula to spread mixture directly onto graham crackers. Gently smooth the top of mixture with wet fingers. Let firm and cool completely. At this point, if you haven’t already, you may cut into squares/something that vaguely resembles squares/amoebas/anything you want.

SONY DSC
SONY DSC

When cooled, melt your chocolate (either in microwave or in a double-boiler), then pour chocolate over. Let chocolate harden, and serve.

SONY DSC
SONY DSC

Words of warning: you will probably not be able to wait until these things are even close to not-still-hot before reaching for them. If you are, kudos, but if not, you were warned, genius. My fingers are still medium-rare from that mistake. Seriously, let these cool…

… Because once you do you will be left with magic. To be honest, they tasted more like s’mores than Mallomars, but I didn’t really care, because they were ridiculous. Also, I discovered that they are somehow even more amazing once frozen. O.M.G. DO THIS. With Independence Day approaching, I cannot think of a better way to salute ‘Murica than this magic.

SONY DSC
SONY DSC
Categories
Bars Chocolate Cheer Classic Favorites Cookies Fancy Pantsy

Homemade Mallobars. (East Coast… Can Ya’ll Really Feel Me?)

*Today’s post is going to be focused on the dessert and will contain little to no complaining on my part, just to see what being a primarily baked good-centered blog feels like.*

So, how do you all feel about Mallomars?

I have no idea if those of you not in the Northeast are privy to the awesome power of the Mallomar. Last I heard, it was an East Coast thang.

I am unsure of my feelings on them.

So unsure that I had to go through several boxes of the seasonal treat this past winter to determine my feelings on them.

So unsure that I attempted to store three boxes away in my freezer so that I could continue to test them during the off-season. (Note: the aforementioned boxes have since mysteriously disappeared)

So unsure that when I realized my reserve boxes had gone missing (Ed note: contents of box were later determined to have been consumed by one James Hilger. Mr. Hilger resides with the author, and will pay dearly for his mistake) I furiously hunted down a homemade recipe for the treat, and vowed to make them as a summertime treat. In your sugar-coated face, archaic Nabisco rules!

If you want the truth, I actually respect Nabisco for attempting to limit my intake of this marshmallowy, chocolate-covered delight on a graham cracker platform. It’s a pretty good marketing strategy, considering the number of salivating Mallomar-devotees lurking outside of my– let’s face it, everyone’s– local Key Food come wintertime. But I just can’t live without ’em. I… I can’t. And so I attempted to make my own. Let’s do this, friends.

Homemade Mallobars (they’re bars because I cut them into bars, because I did. These made about 40 for me)

From the James Beard Foundation

For the Graham Crackers

1/2 cup plus 2 tablespoons of all-purpose flour

1/2 cup plus 2 tablespoons of whole wheat flour (also called graham flour)

Pinch of salt

1/4 teaspoon of baking soda

6 tablespoons of softened butter

2 tablespoons plus 1 1/2 teaspoons of white sugar

2 tablespoons of brown sugar

5 teaspoons of honey

1 egg, beaten

1/2 teaspoon of vanilla extract

For the Marshmallow

1/3 cup of water, plus extra for cooking

1/2 teaspoon of vanilla extract

2 envelopes of plain gelatin

1 cup of white sugar

1/2 cup of light corn syrup

For the chocolate coating

1 1/2 cups of dark chocolate, chopped

We begin with our graham crackers. Now, if I were you, I’d start making these at least a day in advance of when you’d like to enjoy them, mostly because the graham crackers require a fair amount of chilling before being baked. Trust me, these will be well worth the wait.

In a large bowl, whisk together your flours, salt and baking soda. In a separate bowl, cream together butter and sugar until combined, then add in honey. Mix in the egg and vanilla until fully incorporated. Combine with dry ingredients and mix just until batter forms. Cover bowl and chill dough for at least two hours.

Remove dough from bowl and place between two large sheets of parchment paper. Roll out into a 1/8 inch thick sheet. Transfer flattened dough to a baking sheet and refrigerate again for at least an hour, or overnight.

When ready to bake, preheat oven to 325ºF. Carefully remove parchment sheet on top of dough. From here, you can either cut rectangles/squares of dough or bake as an uncut sheet, which is what I did. Transfer to parchment-lined baking sheets and bake for 14 minutes, rotating sheet halfway through baking. Remove from oven and let crackers cool completely.

These are what my rando-shaped graham crackers look like. They look so weird, I know. The taste, however, will make you want to slap the makers of Honey Maid in the face for ever deceiving you.

So…. I decided to taste-test these before continuing on in my mission, mostly because I don’t know that I’ve ever eaten a homemade graham cracker. And I am now sorry that I have spent so much of my life on the store-bought stuff. The homemade ones were soft, sweet and had a deep, almost nutty flavor to them. I hope I never again let my laziness get the better of me by going with the pre-made stuff.

And now, on to the marshmallows. We’ve made marshmallows here before, and this won’t really be any different, but I’ll take you through the steps again so you won’t have to click back and forth.

To make your marshmallows, combine water and vanilla in a small bowl. Sprinkle gelatin evenly over water and set aside for at least 10 minutes. In a separate saucepan, mix together sugar and corn syrup. Pour in just enough water to make the mixture resemble wet sand. Bring mixture to a boil, then lower heat to medium. Cook until the mixture reaches 260ºF (note: if you don’t have a candy thermometer, you can cook until the mixture reaches “soft ball stage.” Place a tiny amount of mixture in a bowl of cold water– if it becomes a soft ball, the mixture is ready to be taken off the heat), then remove from heat. Carefully stir water/gelatin mixture in, and stir until dissolved.

Transfer mixture to a stand mixer and whisk on high speed, taking care that mixture doesn’t splatter. Mix until thickened as much as possible, about 7 minutes. Next, you can either fill a pastry bag with marshmallow mixture or use a rubber spatula to spread mixture directly onto graham crackers. Gently smooth the top of mixture with wet fingers. Let firm and cool completely. At this point, if you haven’t already, you may cut into squares/something that vaguely resembles squares/amoebas/anything you want.

SONY DSC


When cooled, melt your chocolate (either in microwave or in a double-boiler), then pour chocolate over. Let chocolate harden, and serve.

SONY DSC

Words of warning: you will probably not be able to wait until these things are even close to not-still-hot before reaching for them. If you are, kudos, but if not, you were warned, genius. My fingers are still medium-rare from that mistake. Seriously, let these cool…

… Because once you do you will be left with magic. To be honest, they tasted more like s’mores than Mallomars, but I didn’t really care, because they were ridiculous. Also, I discovered that they are somehow even more amazing once frozen. O.M.G. DO THIS. With Independence Day approaching, I cannot think of a better way to salute ‘Murica than this magic.

SONY DSC

Categories
Bars Cakes Chocolate Cheer Classic Favorites Cookies

Sad Shibow Turns One! Let’s Celebrate By Failing Spectacularly At Something, And Then Celebrate More By Gorging Ourselves On Cake

Baby Fat Shibow's First Birthday

This picture’s from my first birthday. I’d never seen it before last night, and after viewing it I promptly burst into tears. Don’t ask me why. It’s been a weird year so far.

Wow. Just…wow. We actually made it. Can I be honest with ya’ll? When I started this blog one year ago today, I was in a crummy (or crumby, get it? Get it? Nyuk nyuk, I’m clever) place. I was physically and emotionally injured man, and I mostly began writing this thing because it distracted me from the hurt back and the hurt heart. I never really imagined that people would actually keep up with this blog, much less enjoy and (sometimes) look forward to it. So if you’ve read this blog, if you’re reading it now, if you’ve ever said a kind word about it, baked something you saw here or simply clicked on something because you saw chocolate and like chocolate, THANK YOU. Thank you for encouraging me to stick with this tiny little blog, and thank you for putting up with me. I can’t tell you how fortunate I feel for all of the amazing people and experiences that have made their way into my life in the past 365 days. Some have been because of this blog, and some have not, but all have shown me how lucky I am to have you guys.

Now, I need to be honest with myself, and with all of you: I am not a good baker. Well, I’m ok. But I’m not a great baker. I know great bakers. They work at places like Butter Lane, or they’re college students named Rhea Mol (HI RHEA MOL!). I recently came to this realization after attempting to make Samoa bars. The Girl Scout treats are #2 on my list of “Cookies That I’ll Need When The World Goes Dark And Only Five People Are Left But The Other Four People Aren’t Into Cookies So My Cookie Stash Is Safe.” Rainbow cookies are #1. Mint chocolate chip cookies did not make the list, and never will, FYI.

Anyway, I think I screwed these bars up something fierce, but my boyfriend claims they are actually really good. That’s why he’s my boyfriend. Let me tell you what I did, and then let me tell you what you should not do.

Things That I Did That You Should Not Do (Unless You Want Sucky Bars)

1. I halved the recipe. You should not halve the recipe.

2. I used Werther’s Caramelts, which are not the same as regular caramels, and are actually not very good by themselves at all. You should not blahblahblah…

3. I did not melt enough caramels, but then again it’s not like I had the right caramels anyway so I was already screwed. So you know what you should not do, right?

Cool. Let’s get to the recipe.

Samoa Bars (makes 30 bars)

For the shortbread base:

1/2 cup of sugar

3/4 cup of softened butter

1 egg

1/2 tsp vanilla extract

2 cups of all-purpose flour

1/4 salt

For the coconut-caramel topping:

3 cups of shredded toasted coconut (toast in a 325º oven for 10 minutes until browned)

12 ounces of chewy caramels, but don’t get cute and try to get fancy ones that aren’t real caramels

1/4 teaspoon of salt

3 tablespoons of milk

10 ounces of semisweet chocolate (you can use chocolate chips)

Preheat your oven to 350°F.

Let’s start with the base. Grease a 9×13″ pan. In a large bowl, cream together butter and sugar until fluffy. Add your egg and mix until fully combined (you may want a hand mixer for this), then stir in vanilla. Add flour and salt, a little at a time, until the mixture is crumbly and grainy. Pour into your pan and press evenly. Send into the oven for 20-25 minutes until the edges have been lightly browned. Let the base cool in the pan for ten minutes, then remove and let it cool completely on a wire rack.

To make the topping, place the UNWRAPPED caramels (I had to say it because you just never know) in a large saucepan over low heat. Add in your milk and salt, and stir until the mixture’s fully melted. Remove from heat and fold in toasted coconut. This will be a workout for your arms. I should know, as I am now ripped. Plunk large heaps of this caramel mixture onto your cookie base with a rubber spatula, then spread evenly until there’s a thick, gooey layer.

Grrr. No, this is NOT what melted caramel is supposed to look like.

Cut into 30 bars.

To melt your chocolate, place into a large bowl over another bowl of simmering water. Stir until completely melted. Dip the bottoms of your bars in the melted chocolate, then lay on parchment paper so the chocolate hardens. Then, using a spoon or a piping bag, drizzle more melted chocolate over the top.

Ok, honestly, these weren’t terrible. But they’re not Samoas, mostly because I’m the opposite of a genius and can’t understand what caramel is, apparently. They were good, but not good enough to keep me from beating myself up over the fact that THEY’RE NOT SAMOAS.

The night after I made these, I decided to make a chocolate cake, to prove to myself that I actually could bake. Let me be honest though, I did not want to make this cake. I was so tired, frustrated and depressed due to some seriously crappy weather that I basically needed to force myself to start this thing. I was going to include that recipe here as well, but I’m thinking it deserves its own post, because it’s probably the most amazing cake I’ve ever made. It’s also, visually, perhaps the ugliest. Stay tuned?

So friends, here’s to another year of screwing up recipes and eating the crazy, crumbly, messy pieces of sweetness anyway. Stay classy. ❤

Categories
Bars Chocolate Cheer Cookies

I Make A Pretty Mean Cookie Bar. Oh, Also, I AM THE WORST.

So originally this was going to be the post where I tell you about my fabulous weekend, which, in my world, started on Thursday with a killer TV On The Radio show in Brooklyn. The show really was fantastic, so much so that my throat was sore from yelling and my feet were pretty much numb from all of the crazy dancing I did. On Friday I finally started to get my running game back up after some major/minor/then kind of major again asthmatic issues, then celebrated by baking the delicious treats I’ll eventually get around to telling you all about. I handed out these treats to Sylvapotamus and several friends who were all thrilled with the free sweets. Here I am frolicking through the land doling out presents like Indian Santa, being the good little baker I am. Sounds great right?

Blurry ball of fire= awesome, awesome night.

Sunday, my friend Andrew was kind enough to invite me over to watch the latest Project Runway episode and the Giants game. I thanked him by bringing over beer and some baked goods. Then I thanked him again by smacking him in the face with a pillow and breaking his glasses–his only pair of glasses– in half. So just be forewarned: if you invite me over, I will bring you delicious sweets. Then I will destroy something you need, love, or need AND love. Oh, and the Giants lost, in case you’re not into football. These things may or may not be related.

I am joking about this, but I feel like a total tool. I mean, sure, he’s got contacts, but who breaks someone’s only pair of glasses? I am a bag of lame. I can only hope that the Dark Chocolate Crumb Bars I left him will tide him over until the next visit to the optician.

I know, I am killing it with the segues. I’m just going to get right into talking about the bars so that I can distract myself from thinking about what a monster klutz I am. They’re delicious. They won’t give you 20/20 vision, but they’ll make you smile. There I go again. 😦

Dark Chocolate Crumb Bars

3/4 cup of butter, softened

1 3/4 cup of all-purpose flour

1/3 cup of granulated sugar

Pinch of salt

1 2/3 cup of dark chocolate chips

14 ounce can of sweetened condensed milk

1 teaspoon of vanilla extract

1 cup chopped nuts of your choice (optional)

1/2 cup of sweetened shredded coconut

Preheat the oven to 350ºF and grease a 9 x 13″ pan. Beat softened butter, flour, sugar and salt until you’ve got a crumbly/fluffy mixture that looks like this:

Press about 2 cups of the mixture evenly into the bottom of the pan and set aside the rest. Throw the pan into the oven for 10 to 12 minutes, until the edges are browned. Meanwhile, combine 1 cup of the chocolate chips in a small bowl with the condensed milk in either or in a small mixing bowl. If you use the saucepan, stir frequently over low heat until the mixture’s fully melted. If you go with the bowl option, microwave the mixture in 30-second increments, stirring in between, until the chocolate is melted and combined with the milk. Stir in the vanilla extract. Remove the pan from the oven and evenly spread the melted chocolate mixture evenly over the crust (make sure you’re using oven mitts while you do this…I’ve got ten burned fingertips that can tell you why).

Meanwhile, stir the nuts, remaining 2/3 cup of chocolate chips, coconut, and other random goodies you might decide to add in (M&Ms perhaps?). Spread this over the chocolate mixture, and bake for 25 to 30 minutes, until the top looks slightly browned and the center is set.

The before.

Remove from oven and cool for about 10 minutes on a wire rack. You can then pop this into the refrigerator to cool completely before cutting into individual bars. You’ll end up with about 30.

Friends and family seemed to really enjoy them. They’re pretty difficult to screw up. I’d post pictures of some of my friends getting into them, but apparently I was too busy beating the crap out of all of them to snap photos. Maybe next time.